This project supports a simple pre-configured development mode. The demo install assumes a secure development environment that is isolated from the internet such as a virtual machine or other development workstation that is protected behind a NAT router. Users, passwords and other credentials are preset to default values in the documentation. No database is required. The development servers do not require TLS certificates. The servers in this development demo should not be exposed directly to the internet.
Alternately, deployment instructions shown on the following page will address configuration changes to make the project more suitable for exposure to the internet. These include TLS certificates, PostgreSQL database, hashed passwords, persistent session storage, and options to disable unused features.
The collab-auth repository is an Oauth 2.0 authorization server. It is the main component of this project. The other three repositories exist only to demonstrate use of the authorization server.
- Linux development environment. Debian 10 and 11 were used for development
- Node.js version 18 or greater is required.
- It is assumed user is familiar with node, npm, and installing packages.
Open a command line terminal. Use the following commands to clone the collab-auth repository and install package dependencies.
git clone git@github.com:cotarr/collab-auth.git
cd collab-auth
npm install
The environment variable NODE_ENV should not exist or it may be set to NODE_ENV=development.
Running the server in development mode will require 3 things.
- A file to define user accounts with login username and password
- A file to define client accounts with client id and client secret
- Certificates containing RSA keys to sign and verify JWT tokens
There is a bash script named "config-dev-script.sh" in the base folder of the repository that will automate these 3 things for setup of a development server. You should review this script before use.
The script will copy example user template and client template files to working files to define users and clients in the development environment. In the development server, the passwords within these files are stored in plain text.
The script will run openssl to generate a pair of files containing the RSA keys. The RSA private key is used add a digital signature to a new token using the "RS256" algoithm. The RSA public key is used to verify the signature whe then token is decoded.
The configuration script can be run with the following npm command. This will execute files specified in package.json.
npm run config-dev-script
The authorization server may now be started in development mode from the command line using the following command. This will execute files specified in package.json.
npm start
This will start a express/node.js server running in the foreground. It may be stopped at any time by pressing Ctrl-c. Check the output for errors. Response should appear as follows:
> collab-auth@0.0.1 start
> node ./bin/www

Server timestamp: 2021-10-26T14:14:45.296Z
Using memory variables for OAuth 2.0 storage.
Auth activity Log: (Console)
HTTP Access Log: (console)
Using memorystore for session storage
Serving static files from /home/some-user/some-folder/collab-auth/public
NODE_ENV development starting http (non-encrypted)
listening: :::3500 IPv6
To confirm the web browser is running, open your web browser and visit http://127.0.0.1:3500/status. The server should respond with the following "ok" message
{"status":"ok"}
In development mode, the server access log is sent to the console. The status request should be visible in the terminal window.
2021-10-27T13:51:24.752Z ::ffff:127.0.0.1 200 GET 1.1 127.0.0.1:3500/status
This demonstration is configured to use http connections to localhost/127.0.0.1 without https TLS encryption. This is appropriate when testing the authorization server in an isolated environment such as a virtual machine.
As time marches forward, some web browsers may not allow password forms without TLS encryption. If the following steps fail, check the address bar to see if http is being automatically upgrade to http(s) TLS request by the browser. In my development VM in October 2021, the Linux version of the both Chromium and Chrome web browser still worked without issue when sending non-encrypted http requests to localhost or 127.0.0.1.
If your web browser requires a temporary self signed TLS certificate for testing, you may generate one. See: data/tls-certs/README.md
Next, we will look at the user file. We are currently running in development mode, and therefore no database has been configured. In this mode, each time the server is restarted, the users are loaded from a file "user-db.json" located in the base folder of the repository. Returning to the terminal, display the file using the cat command. You will see a user named Bob Smith has been defined.
cat users-db.json
{
  "id": "05d3649f-2bdc-4e0e-aaf7-848dd1516ca0",
  "username": "bob",
  "password": "bobssecret",
  "name": "Bob Smith",
  "loginDisabled": false,
  "role": [
    "auth.token",
    "api.write",
    "user.admin"
  ],
  "lastLogin": null,
  "createdAt": "2021-08-22T18:38:29.250Z",
  "updatedAt": "2021-08-22T18:38:29.250Z"
}
The data is encoded in standard JSON format. You can see that a user Bob Smith has been created with username "bob" and password "bobssecret". In the array of roles, user bob also has been assigned the role of "user.admin". This role will permit bob to access the administration panel. Return to the web browser and enter the URL http://127.0.0.1:3500/panel/menu. While attempting to request that page, the server will determine you are not currently logged in and redirect your browser to the login form.
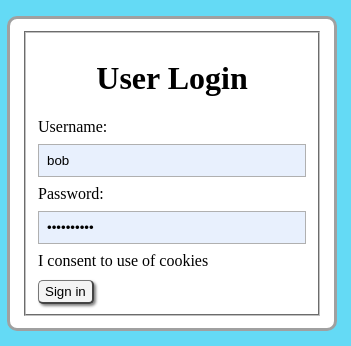
Enter the username "bob" and password "bobssecret". Assuming the password is accepted, you should be redirected back to the admin panel at http://127.0.0.1:3500/panel/menu.
The page background color has been set to light blue to indicate the current page displayed in the browser is located on the authorization server as opposed to other servers in the demo.
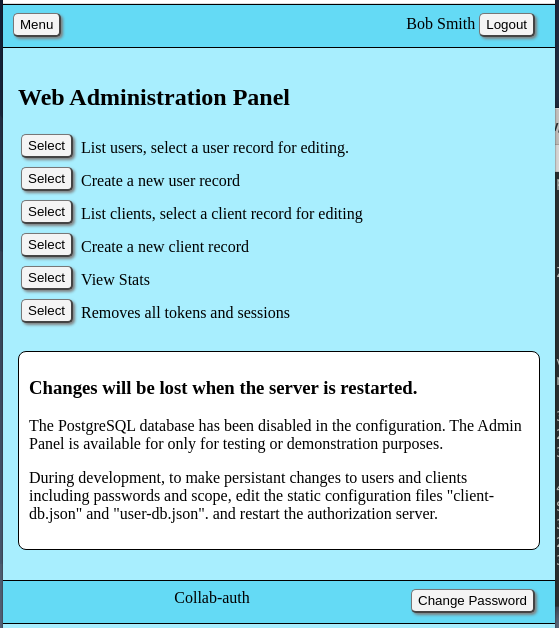
Congratulations, the authorization server is up and running. Feel free to look around. The editor is functional, but since the server is running in development mode, all data is stored in RAM memory variables and all data will be discarded when the server is stopped.
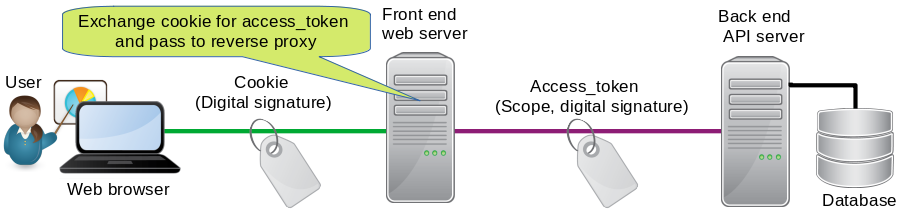
The collab-frontend repository is a mock web server using the npm passport package and passport-oauth2 passport strategy to implement Oauth 2.0 to restrict access to the web page. The web server emulates a personal web page that would require user authentication to view the page and gain access to data in home network IOT devices. Unauthorized users are redirected to the Oauth 2.0 server for user login. After login, the web server stores the user's Oauth 2.0 access_token used to obtain access to a mock SQL database. The web server includes a reverse proxy to redirect requests to the mock REST API.
The diagram below shows the frontend web server at the center. The overall purpose of the collab-frontend repository is to demonstrate the relationship between the user's cookie stored in the web browser on the left, the user's Oauth 2.0 access_token, stored in the frontend web server in the middle, and use of the token to access resources on the backend API server shown on the right.
Each of the different components of this demonstration will run in separate terminal windows that are open concurrently. Leave the previous authorization server terminal open. Open a second command line terminal for the web server. Use the following commands to clone the collab-frontend repository and install package dependencies.
git clone git@github.com:cotarr/collab-frontend.git
cd collab-frontend
npm install
The environment variable NODE_ENV should not exist or it may be set to NODE_ENV=development.
The application should run as-is. No configuration is necessary in development mode. The web server may now be started in development mode from the command line using the following command. This will execute files specified in package.json.
npm start
This will start an express/node.js server running in the foreground. It may be stopped at any time by pressing Ctrl-c. Check the output for errors. Response should appear as follows:
> collab-frontend@0.0.1 start
> node bin/www

Server timestamp: 2021-10-27T13:35:32.928Z
HTTP Access Log: (console)
Using memorystore for session storage
Serving files from: /home/some-user/some-folder/collab-frontend/secure
NODE_ENV development starting http (non-encrypted)
listening: :::3000 IPv6
For the demonstration to work properly with cookies, the authorization server requires a different hostname than the web server. Previously, we used "127.0.0.1" for the authorization server. Alternately, for the web server "localhost" will be used. To confirm the web server is running, open your web browser and visit http://localhost:3000/status. The server should respond with the following "ok" message
{"status":"ok"}
In development mode, the server access log is sent to the console. The status request should be visible in the terminal window.
2021-10-27T13:48:10.774Z ::ffff:127.0.0.1 200 GET 1.1 localhost:3000/status
The next step is to use both servers at the same time to execute the oauth workflow. This will use the authorization server for password entry, and use the web server to display content.
Before trying this we need to clear previous session and cookie data. Since the development configuration uses RAM memory to store session on both the web server and authorization server, the easiest way is to stop and restart both node applications. Go to each terminal window, press Ctrl-C to stop both servers, and restart both servers with "npm start".
Next, attempt to open the main web page by loading http://localhost:3000/.
When the browser sends the GET request to the web server for the main home page, the web server searches the session store for a matching cookie. No cookie is found. The connection is assumed to be unauthorized. The web server will send a redirect (302) to the browser to redirect to a URL for a landing page at path "/unauthorized" on the web server.
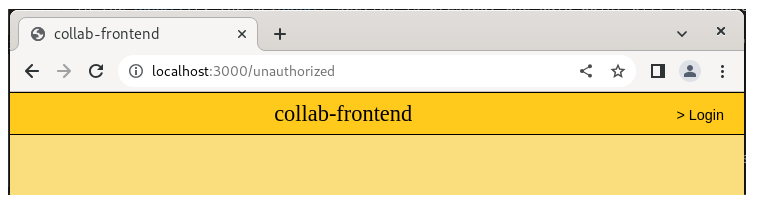
This landing page is an unprotected page that users will see before authenticating their identity with a user password. Optional content may be added to the unprotected landing page to identify the web site and display publicly available content about the web site. The access log in the terminal will show 302 redirect followed by the browser download of the landing page.
  2021-11-27T11:22:38.685Z ::1 302 GET 1.1 localhost:3000/
  2021-11-27T11:22:38.688Z ::1 200 GET 1.1 localhost:3000/unauthorized
  2021-11-27T11:22:38.723Z ::1 200 GET 1.1 localhost:3000/unauthorized.css
Next, select the "> Login" link located on the right side of the yellow header bar on the to of the landing page. This is a custom styled <button> element wrapped in an <a> tag. Clicking the link will request the "/login" route on the web server which can be seen in the web server access log.
2021-11-27T11:23:29.472Z ::1 302 GET 1.1 localhost:3000/login
During the next instructions, the user interaction will switch from the web server to the authorization server.
When the web server receives the "/login" request, it will send a second redirect (302) to the browser. The URL will consist of the hostname of the authorization server, the /dialog/authorize path followed by a query string with parameters for response_type, redirect_uri, scope, state, and client_id.
In order to address risk of Cross Site Request Forgery (CSRF) during redirects, the passport middleware can be configured to generate a random nonce, store the nonce in the web server session, and include the nonce in the URL query parameters as a "state" parameter.
After receiving the request, the authorization server will save the entire request URL in the authorization server session store. It will check if the user has a valid cookie. Since we have previously cleared all session data by restarting the servers, no match will be found in the session store. The authorization server will respond to the /dialog/authorize request by returning an HTML response containing a login form.
Switch from the web server terminal to the authorization server terminal. The authorization server access log will show the Oauth 2.0 authorization workflow starting with the request to the "/dialog/authorize" route. In this case, the browser does not have a valid cookie to the authorization server, so the URL query parameters are saved to session storage. A status 302 redirect is returned to the browser to load the login form, which is shown as the "/login" in the log.
2021-10-27T19:04:31.021Z ::ffff:127.0.0.1 302 GET 1.1 127.0.0.1:3500/dialog/authorize?response_type=code
    &redirect_uri=http%3A%2F%2Flocalhost%3A3000%2Flogin%2Fcallback
    &scope=api.read%20api.write&state=yqqgmehhSZGTj6iBylA6zfJz&client_id=abc123
2021-10-27T19:04:31.040Z ::ffff:127.0.0.1 200 GET 1.1 127.0.0.1:3500/login
2021-10-27T19:04:31.063Z ::ffff:127.0.0.1 200 GET 1.1 127.0.0.1:3500/css/login.css
The user will submit his password and an username using a POST request to the /login path contained in the form. Enter the username "bob" and password "bobssecret". Upon submission of the login form, check the authorization server terminal.
2021-10-27T19:04:34.886Z ::ffff:127.0.0.1 302 POST 1.1 127.0.0.1:3500/login
The authorization server compares the username and password to values located in the user database. If the password is correct, the authorization server saves the user's cookie id in the user's session store on the authorization server. This user will now be considered authorized for access to the authorization server HTTP requests.
The authorization server will retrieve previously saved URL from the /dialog/authorize request. The authorization server will respond to the password form POST /login request with a redirect (302) to the saved URL, including the query parameters. In other words, the same redirect is received a second time. The second redirect can be seen in the log file as follows:
2021-10-27T19:04:34.897Z ::ffff:127.0.0.1 200 GET 1.1 127.0.0.1:3500/dialog/authorize?response_type=code
   &redirect_uri=http%3A%2F%2Flocalhost%3A3000%2Flogin%2Fcallback&
   scope=api.read%20api.write&state=yqqgmehhSZGTj6iBylA6zfJz&client_id=abc123
This time, when the second request to /dialog/authorize is received, the user's web browser now has a valid cookie.
At this point in the workflow, the intended scope value of the requested token is determined. Scope is an implementation dependent concept. A string or list of strings is added to the token to add additional granularity to permissions associated with the access_token. In this implementation, the token's scope value is the intersection of the list of allowedScope values in the web server's client account, the list of role values in the user's account, and the list of scope values in the query string of the /dialog/authorize request. In this demonstration, "api.write" is present in all three, and api.write will be queued for future use in generating the token.
There are two possible responses to the /dialog/authorize path depending on the client account configuration. If the client account has trustedClient=true, then the authorization server will respond to the /dialog/authorize request with a redirect (302) to the /login/callback path with an authorization code. This is not the case in this demo because trustedClient is set to false.
In the case of this demo, with the client account set to trustedClient=false, the authorization server responds to the second /dialog/authorize request by returning a HTML response to the browser with a second form requesting the user to accept or deny the resource request.
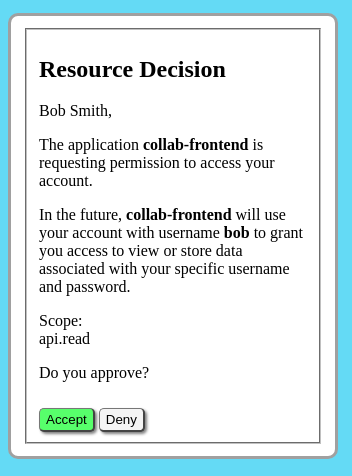
At this point, the user selects [Accept]. The form submits a POST request to the /dialog/authorize/decision path included in the form. Assuming the user has selected Accept, the authorization server will parse the callback URI specified in the query parameters that were stored from a previous request. It will search for the callback URI in the client account configuration to see if it is listed in the allowedRedirectURI which is an array listing one or more allowed URIs.
Assuming the callback URI is valid, the authorization server will reply to the /dialog/authorize/decision request with a redirect (302) to the web server hostname, the /login/callback path, and with a temporary random authorization code appended to the URL as a query parameter. The authorization server access log should show the redirect as follows:2021-10-27T19:28:32.487Z ::ffff:127.0.0.1 302 POST 1.1 127.0.0.1:3500/dialog/authorize/decision
The web server, which has been idle during this time, accepts the redirect to the /login/callback URI. The temporary authorization code is present as the query parameter "code". The web server access log should show the redirect including the code.
2021-10-27T19:28:32.506Z ::ffff:127.0.0.1 302 GET 1.1 localhost:3000/login/callback?code=8JUuYggcFkGcDh1BsulCkiLL&state=yqqgmehhSZGTj6iBylA6zfJz
Before proceeding the passport middleware extracts the "state" parameter containing the random nonce generated earlier. The nonce is compared to the previous value stored in the web server session storage prior to the redirect.
{
  "state": "yqqgmehhSZGTj6iBylA6zfJz"
}
After successfully verifying the state nonce, the web server extracts the temporary code from the query parameters of the redirect URI.
{
  "code": "8JUuYggcFkGcDh1BsulCkiLL"
}
The web server directly submits a POST request to the authorization server /oauth/token path. The request includes the code, client_id, client_secret, redirect_uri, and grant_type. This request is a direct connection between the web server and authorization server. The user's web browser is not involved in this transaction.
The authorization server then validates the authorization code and client credentials. It checks to see if the client account allowedScope includes "auth.token". A scope of auth.token indicates the client account used by the web server is allowed to issue tokens. Other clients may not have this privilege. For example: a backend API server may be limited to checking tokens and would use a scope value of auth.info which may not issue new tokens.
Assuming all the validations have passed, the authorization server creates a new access_token using the RSA private key specified in the configuration. For those who are curious, the token is a JWT token. It is a string that consists of 3 parts separated by a period "." where is the first part is a token header that identifies the type of token, the second part is the token payload, and the third part is the digital signature which can be used to verify the token using the RSA public key (certificate).
Example access_token:
eyJhbGciOiJSUzI1NiIsInR5cCI6IkpXVCJ9.eyJqdGkiOiIwYjQ4ODVhOS1iZTI0LTQwNGYtOTV
jZS03ZTAxZjg1YmM4MGQiLCJzdWIiOiJhN2IwNmE2ZC03NTM4LTQ1YzgtYmI1Zi1iMTA3YTgyNTh
jN2QiLCJpYXQiOjE2MzY4ODQ5ODcsImV4cCI6MTYzNjg4NTA0N30.H7CGN8nR0uEreeuMz-Jdp38
1z_Nq4WphrJ38h5nnPhljuPGNe9MT14DtU1AP_CiaY7hivcXJrBRL1WQ-XpTl7g6LPaiAn1cn49Z
KjUP_LAizE5-oMAA2vLokS3udXgeEFvHQhBMa_iffv30VldgnbdlTYrC1qO0NAWVYvve1dlyW7mb
KWjGMpKsrrt3h0xzwLJ_alvdfqZkiLcTqF0RiCaPI3LT-AVk0LULynhslkEdcFG8k2koIAKnkPZa
ycWcvuBaRoAYGwqAx1o77FXt7b4nwH7gKEvZoxa3jSi-_dtaVD4hyJ6dVc7JASyuz7TdQDGOahLw
QkseSgdL9TrTsLg
Although the contents are digitally signed, the contents are not encrypted, but rather encoded as base64 encoded JSON which can be base64 decoded. The payload contains a unique token id as "jti", the id of the credentials used to create the token as "sub", and the token expiration as a unix time in seconds.
Decoded token payload:
{
  jti: '0b4885a9-be24-404f-95ce-7e01f85bc80d',
  sub: 'a7b06a6d-7538-45c8-bb5f-b107a8258c7d',
  iat: 1636884987,
  exp: 1636885047
}
The end user will not have access to the token itself. It will be stored on the user's behalf by the web server. The authorization server responds to the /oauth/token request by sending a response containing and access_token and refresh_token directly to the web server in the body of the response. The response status is set to 200 to indicate success. This should show in the authorization server access log as follows:
2021-10-27T19:28:32.502Z ::ffff:127.0.0.1 200 POST 1.1 127.0.0.1:3500/oauth/token
When the web browser receives the new access_token from the authorization server, it stores the token in the user's session store on the web server. The session is marked as authorized. The user is considered authorized to retrieve local files from the web server. The token is available for future use as long as the users cookie and session are valid. For security reasons, the user never takes possession of the access_token and does not have access to retrieve the token directly.
While the new token is being retrieved by the web server, the users request to /login/callback is suspended asynchronously, waiting the result of the token request. When the oauth handshake is complete and a valid token received, the /login/callback request returns a redirect (302) to the main home page at the / path. The browser will proceed to load the web page. The 302 redirect shown in the log here is duplicated for clarity, also shown above.
2021-10-27T19:28:32.506Z ::ffff:127.0.0.1 302 GET 1.1 localhost:3000/login/callback?code=8JUuYggcFkGcDh1BsulCkiLL&state=yqqgmehhSZGTj6iBylA6zfJz

          ( access_token request --> wait --> redirect )

2021-10-27T19:28:32.512Z ::ffff:127.0.0.1 200 GET 1.1 localhost:3000/
2021-10-27T19:28:32.537Z ::ffff:127.0.0.1 200 GET 1.1 localhost:3000/css/styles.css
2021-10-27T19:28:32.539Z ::ffff:127.0.0.1 200 GET 1.1 localhost:3000/js/main.js
In this example, loading or re-loading the web page will check the status of the access_token.
To clarify, there are two levels of access. The user's cookie stored in the browser permits the browser to access the web server. The user's access_token stored in the web server is then appended to secondary requests to retrieve other protected resources.Up until this point, most of the functionality used to login and obtain an access_token occurred on the server side. This section includes additional JavaScript code that executes in the browser.
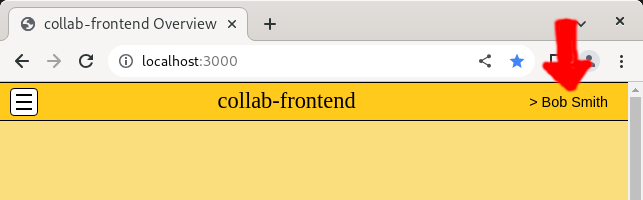
Assuming user's cookie will authorize access to the web server, the main web page HTML, CSS and JavaScript files are requested by the browser, and the web page loads. When the page finishes loading, a browser window.onload event fires to trigger a function that performs a browser fetch to the web server /userinfo endpoint. When the web server receives the /userinfo request, the server retrieves the access_token that was stored on the user's behalf in session store. With the users's access_token and the web server's client client credentials, the web server performs a POST request to the authorization server /oauth/introspect path to check the access_token. After several validation checks, including token signature verification and database token lookup, the authorization server responds to the POST request by returning token meta-data to the web server. In turn the web server extracts the user information from the meta-data and responds to the original /userinfo request.
JavaScript in the web browser then extracts the user's real name from the /userinfo request. The string value of the real name is inserted into a custom styled <button> element on the right side of the web page header bar. You should now see "> Bob Smith". The presence of the real name in the header bar confirms the user's access_token is valid.
The /userinfo request can be seen in the web server access log.
2021-10-29T16:18:26.858Z ::ffff:127.0.0.1 200 GET 1.1 localhost:3000/userinfo
The /userinfo request generating an /oauth/introspect request can be seen in the authorization server access log.
2021-10-29T16:18:26.854Z ::ffff:127.0.0.1 200 POST 1.1 127.0.0.1:3500/oauth/introspect
Re-loading the page will attempt to resolve any missing authorization. There are two possible cases.
- Invalid web server cookie: web server redirect to /unauthorized
- Invalid access_token: browser opens /unauthorized
The background color of the web server home page has been set to yellow to distinguish web server pages (yellow) from authorization server pages (blue).
The upper left corner of the web page shows a menu icon. An expandable dropdown menu may be used to switch between different demonstration functions that are used in the next sections.
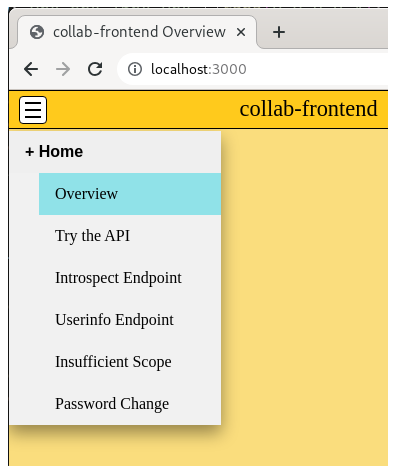
In the left dropdown menu, select "Try the API".
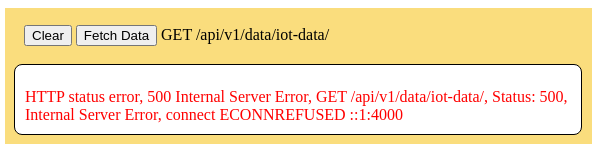
This panel allows the web server to make a request to the REST API /api/v1/data/iot-data/ route. Try pressing the [Fetch Data] button. At this stage of the demonstration the request will fail because the mock SQL database has not been installed and is not running which causes a "ECONNREFUSED" connection refused error. This button be revisited in the next section after installation of the mock database.
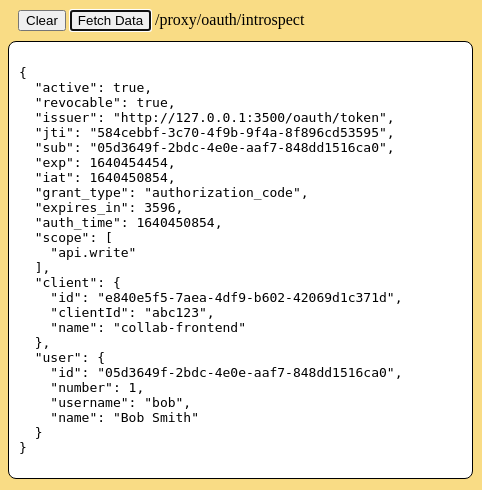
In the left dropdown menu, select "Introspect Endpoint".
This panel allows the web server to make a request to the /proxy/oauth/introspect route. This is a custom demonstration API on the web server that will display the token validation results for the currently stored user access_token. This functionality is not normally available to the user. It is used by resource servers, such as the database API, to confirm validity of a user's token before honoring the HTTP request. It was added to this demonstration to show the contents of the token meta-data. Press the [Fetch Data] button to initiate the request and display the results on the page.
Note that the token's scope is set to "api.write" due to the user role "api.write" in the user account record. This user is allowed to read and write to the table in the mock database.
To consider the token to be valid, the application should check for both status 200 in the http request and the property `active === true` in the body of the response.
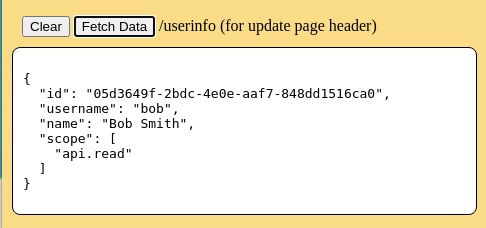
In the left dropdown menu, select "Userinfo Endpoint".
This panel allows the web server to make a request to the /userinfo route. Previously, during the user login process, a request to the /userinfo route was used to display the user's real name in the upper right of the webpage as an indication of successful login and retrieval of a valid access token. This information is available in the web browser for use in interacting with the web server and backend database using data specific to the user who is logged into the webpage. Press the [Fetch Data] button to initiate the request and display the results on the page.
The collab-backend-api repository is a mock REST API. The mock database includes one table to accept POST and GET requests. In memory RAM variables are used to emulate database storage. API access is restricted using Oauth 2.0 bearer tokens. Token validation is performed by sending the tokens to the authorization server for remote validation. Individual route authorization may be further restricted based on token scope values that are associated with the access_token.
In this demonstration, the purpose of the backend API is to demonstrate how a secondary database server, independent of the main web server, can use OAuth 2.0 access tokens to authorize HTTP requests that perform database queries. This is done by extracting the access token from the HTTP request and sending the token to the authorization server. The authorization server will verify the token's digital signature, extract token ID, search token database for matching ID, then return the token's meta-data to the backend database server.
This backend API will also run in a separate terminal window. Leave the previous authorization server terminal and web server terminal open. Open a third command line terminal for the backend API. Use the following commands to clone the collab-backend-api repository and install package dependencies.
git clone git@github.com:cotarr/collab-backend-api.git
cd collab-backend-api
npm install
The environment variable NODE_ENV should not exist or it may be set to NODE_ENV=development.
The application should run as-is. No configuration is necessary in development mode. The backend API server may now be started in development mode from the command line using the following command. This will execute files specified in package.json.
npm start
This will start a express/node.js server running in the foreground. It may be stopped at any time by pressing Ctrl-c. Check the output for errors. Response should appear as follows:
> collab-backend-api@0.0.1 start
> node bin/www

Server timestamp: 2021-10-30T22:20:13.177Z
Token cache enabled, lifetime: 60 seconds.
HTTP Access Log: (console)
NODE_ENV development starting http (non-encrypted)
listening: :::4000 IPv6
The backend API also requires a different hostname than the authorization server. Previously, we used "127.0.0.1" for the authorization server. Alternately, for the backend API "localhost" will be used. To confirm the backend API is running, open your web browser and visit http://localhost:4000/status. The server should respond with the following "ok" message
{"status":"ok"}
In development mode, the backend API access log is sent to the console. The status request should be visible in the terminal window.
2021-10-30T22:23:16.771Z ::ffff:127.0.0.1 200 GET 1.1 localhost:4000/status
| Method | Route | Description |
|---|---|---|
| GET | /v1/data/iot-data/ | List all mock records, maximum is 10 |
| POST | /v1/data/iot-data/ | Save mock record with following schema |
To submit data to the iot-data table in the database, the HTTP request should use the POST method to the "/v1/data/iot-data". An "Authorization" header is to be added to the HTTP request containing "Bearer xxxxx.xxxxxx.xxxxx" where xxxxx.xxxxxx.xxxxx should be a string containing the access token. The data to be submitted should be encoded in JSON format and included in the body of the POST request as follows:
{
  "deviceId": "iot-device-12",
  "timestamp": "2021-09-17T15:33:07.743Z",
  "data1": 25.486,
  "data2": 25.946,
  "data3": 24.609
}
A successful request should return status 201 (Created). If the access token is missing, expired, or otherwise invalid, the API will return 401 Unauthorized. If the request does not have sufficient scope to access a specific route or database table, the API will return 403 Forbidden. In this case scope of "api.write" is needed.
To retrieve data from the iot-data table in the database, the HTTP request should use the GET method. An "Authorization" header be added to the HTTP request containing "Bearer xxxxx.xxxxx.xxxxx" where xxxxx.xxxxx.xxxxx should be a string containing the access token. The access token should have possible scope of "api.read" or "api.write", either scope will be accepted. The mock API will append a record id using UUID.v4 format. A createdAt and updatedAt timestamp will also be appended to the record. The API will return an array of objects in JSON format. Considering this is a demonstration, the array size is limited to a maximum of 10 elements, and the most recent 10 timestamped data points from the mock IOT device should be available in the array.
[
  {
    "id": 1277,
    "deviceId": "iot-device-12",
    "timestamp": "2021-09-17T15:32:08.417Z",
    "data1": 24.831,
    "data2": 27.241,
    "data3": 22.307
    "updatedAt": "2021-09-17T15:33:07.797Z",
    "createdAt": "2021-09-17T15:33:07.797Z"
  }
]
Confirm the authorization server is still running in the first terminal window. If it is not running, open a terminal window and restart as described above.
Confirm the web server is still running in the second terminal window. If it is not running, open a terminal window and restart as described above.
Lastly, confirm the mock backend API should is running in the third terminal window.
Open your web browser and load the home page at http://localhost:3000.
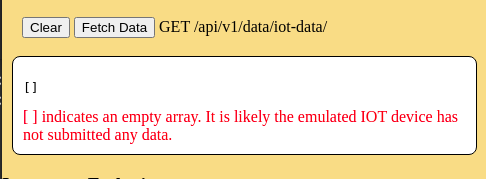
In the left dropdown menu, select "Try the API".
This panel allows the web server to make a request to the REST API /api/v1/data/iot-data/ route. When the web server receives the request, it will first check the login status of the browsers cookie and return a 401 Unauthorized error if the user's login is invalid. The web server will then parse and remove the "/api" prefix from the route and forward the request to the reverse proxy route in the web server. All requests prefixed with /api will pass to the reverse proxy. The user's access_token is appended to the request by adding an "Authorization" header containing bearer token, similar to "Bearer xxxxx.xxxxx.xxxxx" Press the [Fetch Data] button.
Check the terminal window for the web server to see the web server access log. Note the status value of 200. Also, the "/api/" prefix is included in the route.
2021-10-31T14:54:24.042Z ::ffff:127.0.0.1 200 GET 1.1 localhost:3000/api/v1/data/iot-data/
The Backend API receives the request. First the API will check to see if an authorization header is present. It extracts the bearer token from the request authorization header. The Backend API then sends the user's access_token, and the backend API's client ID and client secret to the authorization server /oauth/introspect route.
The authorization server will first lookup the web server's client account to confirm the client secret matches the submitted value. The allowedScope of the client account will be checked to see if the client account has permission to check tokens at the /oauth/introspect endpoint. In this case the API client account has allowedScope auth.info which is accepted.
The authorization server will check the digital signature on the token. The token will be decoded to remove it's unique ID value. The token id will be used by performing a database lookup of the access_token in the token database and then performing various validation checks. Assuming the token is valid, the authorization server returns a response to the backend API containing the token meta-data from the token database. This will appear in the authorization server access log showing status 200.
2021-10-31T15:03:27.482Z ::ffff:127.0.0.1 200 POST 1.1 127.0.0.1:3500/oauth/introspect
When the backend API receives the response from the authorization server, it will confirm response status equals 200. The token meta-data will be parsed to confirm the property "active" equals true. The API will extract a string containing the access_token's scope value. The scope restrictions may be specific to an individual route or database table. In this case, either api.read or api.write is required to perform a database read. If the scope is insufficient a 403 Forbidden response will be returned. If the access_token is expired or otherwise invalid, a 401 Unauthorized response will be returned. If token is valid and scope is sufficient, the requested database query will be performed and the response returned to the web server in typical REST API format as JSON in the body of the request. This will appear in the backend API access log showing status 200. Note: the "/api" part of the route was removed by the web server bofore forwarding the request to the backend API.
2021-10-31T15:04:50.428Z ::ffff:127.0.0.1 200 GET 1.1 localhost:4000/v1/data/iot-data/
During this time, JavaScript in the web browser was asynchronously waiting for the GET request to complete. When it receives the response, the result is displayed on the page for the user to see.
In this case, the database table is empty because we have not installed the mock IOT device. This will be done in the next sections. The JSON response contains and empty array []. The comment in red text is generated by the page javascript for informational purposes, and will not be displayed if the array contains data.
The collab-iot-device repository is a mock IOT device that will emulate data collection from a physical device on a home network. Oauth 2.0 access_token will be obtained from the authorization server using grant type client credentials. Using a timer loop, mock data will be periodically sent to a mock database API. New access_tokens are obtained as needed from the authorization server.
This demonstration is aimed toward using IOT devices on a home network. One example would be a Raspberry Pi located at various places around the house. Each Pi may have various sensors, such a outdoor temperature or refrigerator temperature. For this demonstration 3 temperatures are being emulated. A random number generator produces simulated temperatures. New emulated data is generated once per minute. The emulated IOT device produces JSON encoded data that would look like this:
{
  "deviceId": "iot-device-12",
  "timestamp": "2021-09-17T15:32:08.417Z",
  "data1": 24.831,
  "data2": 27.241,
  "data3": 22.307
},
IOT devices are automated machine devices that operate continuously. The use of a user login and password is impractical for security reasons, because each of multiple devices would need to store the user's password. Oauth 2.0 allows IOT devices operate under their own authority without a user. Oauth 2.0 supports a token grant type called "Client Credentials" grant. This type of token is sometimes called a machine token, as opposed to a user token. In order to demonstrate this method, a client record has already been created in the Oauth 2.0 authorization server. The client_id and client_secret have been placed in the configuration of the IOT device.
Looking at the network diagram on the home page, it can be seen that the database API resource server requires a valid access_token to read or write data to the database. Therefore, the IOT device must obtain a new valid Oauth 2.0 access_token.
The IOT device will connect to the authorization server over the network. Using the IOT device's client credentials, it will request a new access token using client credentials grant. It will use the access token to gain access to the database API server.
This implementation also supports use of token scope for granular permissions. A database may include multiple different tables. It is useful to provide further granularity so access can be restricted differently for each database table. This is done by assigning a scope value to the token, such as api.read, api.write, or api.admin. The "api.write" is the intended scope this for this demo.
As clarification, a second scope is also needed for the authorization server to specificity the type of token interactions that are allowed to issue token or inquire token validity. The authorization server in this case accepts possible scopes of auth.info, auth.token, auth.client. The "auth.client" designates that the authorization server can issue tokens directly to a client based on the clientId and scope, without association with a specific user login. Combined, the client account allowedScope value should include:
- "api.write" - Provides access to API routes that allow this scope
- "auth.client" - Permits the authentication sever to issue client access_tokens.
The Raspberry Pi or other IOT device would then perform the following steps:
- A cycle timer is created to trigger data acquisition at fixed intervals
- Each timer event triggers the IOT device to collect data from it's sensors
- The IOT device checks it's token cache to see if has a non-expired access token
- If necessary, the IOT device requests a new access_token
- The new access token is stored in the token cache along with it's expiration time.
- An HTTP POST request is prepared for transmission to the API database server
- The access token is attached to the HTTP request Authorization header as a Bearer token.
- The POST request is sent to the API.
- The expected HTTP response status is 201 (Created)
- 401 Unauthorized response indicates the token is likely expired or otherwise invalid.
- 403 Forbidden response indicated the client credentials do not have sufficient scope.
This Mock IOT device will also run in a separate terminal window. Leave the previous authorization server terminal, web server terminal, and the backend API terminal open. Open a fourth command line terminal for the Mock IOT device. Use the following commands to clone the collab-iot-device repository and install package dependencies.
git clone git@github.com:cotarr/collab-iot-device.git
cd collab-iot-device
npm install
The environment variable NODE_ENV should not exist or it may be set to NODE_ENV=development.
The application should run as-is. No configuration is necessary in development mode. The web server may now be started in development mode from the command line using the following command. This will execute files specified in package.json.
npm start
This will start a express/node.js server running in the foreground. It may be stopped at any time by pressing ctrl-C.
The mock IOT device is different from the other three terminal windows because no express server is included. It is not capable to accept any HTTP requests. It can be understood as an "Output Only" device. Should an error occur, the error will be displayed in the terminal window For example, if the backend API is not running a "ECONNREFUSED" error message will be show in the terminal. Starting the mock IOT device should show the following in the terminal:
> collab-iot-device@1.0.1 start
> node src/index.js

2023-07-09T19:32:46.563Z collab-iot-device started with interval 60 seconds.
2023-07-09T19:32:47.656Z Submitted mock data, id=1, using new token expiring in 86400 seconds
Upon startup, the mock IOT device will initiate a cycle timer at 60 second intervals. It will immediately generate emulated data and make it's first data submission to the backend API. Additional data points will be submitted at 60 second intervals thereafter.
The IOT device will check to see if it has a valid access token that has been used previously and cached for future use. In this case, the IOT device was just started for the first time so no token will be found. A new access_token will be obtained by submitting a POST request to the authorization server /oauth/token route. The request includes the clientID and clientSecret assigned to the IOT device, as well as the grant type and requested scope. The client account assigned to the IOT device must include allowedScope "auth.client" to allow issuance of tokens without user credentials.
The authorization server access log will show the token request.
2021-12-26T17:12:39.270Z ::ffff:127.0.0.1 200 POST 1.1 127.0.0.1:3500/oauth/token
The IOT device will then build a POST request to submit a new data point to the backend API. For demonstration purposes, emulated data will be generated using random number generator. The data object should appear like the following.
{
  "deviceId": "iot-device-12",
  "timestamp": "2021-09-17T15:32:08.417Z",
  "data1": 24.831,
  "data2": 27.241,
  "data3": 22.307
},
The IOT device appends the IOT Device access_token to the POST request authorization header as a bearer token. The request is submitted to the backend API.
Similar to the read operation described above, this database write request is authorized by sending the access_token that was extracted from the IOT Device's POST request to the authorization server for validation. This will show in the authorization server access log with status 200.
2021-12-26T17:12:39.320Z ::ffff:127.0.0.1 200 POST 1.1 127.0.0.1:3500/oauth/introspect
When the backend API receives the response from the token validation by the authorization server, the backend API will honor the request and perform a write query to the database, saving the data point. After successful addition of the data to the database, the backend API will complete the request to the IOT device by sending a response to the IOT device with status 201 (Created) as shown in the backend API access log.
2021-12-26T17:12:39.335Z ::ffff:127.0.0.1 201 POST 1.1 localhost:4000/v1/data/iot-data/
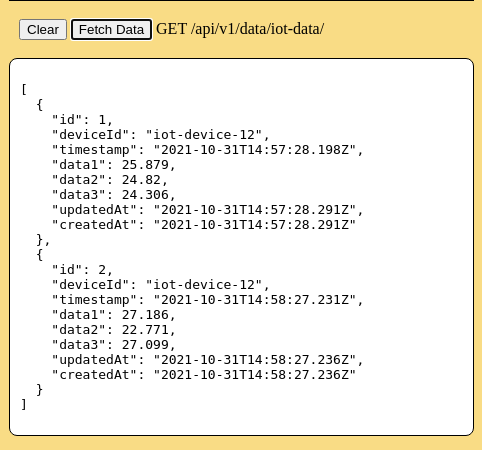
The database in the mock Backend API now contains 1 data point. Return to the web page using the browser. This time, when the [Fetch Data] button in the "Try the API" section is pressed, one data point will be displayed.
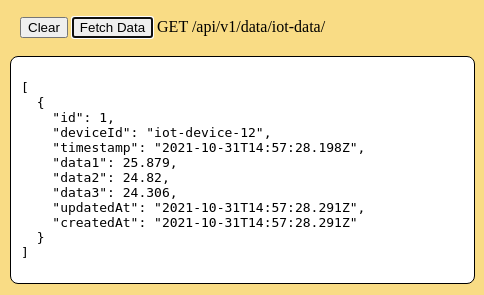
Wait approximately 1 minute for the next IOT Device timer cycle. It will submit a second data point to the backend API. In this case the IOT Device already has a valid access_token, so the stored access_token is used immediately for the IOT Device to submit a new POST request to the backend API. When the browser [Fetch Data] button is pressed, two data points will now be displayed.
The console terminal for the collab-iot-device will show the log entries for submissions of mock data and the token used to submit the data.
2023-07-09T19:32:46.563Z collab-iot-device started with interval 60 seconds.
2023-07-09T19:32:47.656Z Submitted mock data, id=1, using new token expiring in 86400 seconds
2023-07-09T19:33:46.597Z Submitted mock data, id=2, using cached token expiring in 86341 seconds
2023-07-09T19:34:46.601Z Submitted mock data, id=3, using cached token expiring in 86281 seconds
2023-07-09T19:35:46.652Z Submitted mock data, id=4, using cached token expiring in 86221 seconds
2023-07-09T19:36:46.704Z Submitted mock data, id=5, using cached token expiring in 86161 seconds
In the left dropdown menu, select "Insufficient Scope".
This panel allows the web server to make a PUT request to the /api/v1/data/iot-data/1 route. This will be used to demonstrate use of scope to restrict access.
OAuth 2.0 provides two different levels of access control. First, a valid access token may be required to access online resources. In many cases this may be sufficient.A valid access token would allow full access to all resources on a web site. Without a valid token, all access is denied.
In some cases a deeper level of granularity may be useful. For example, one user account may have read-only access to a database table. A different user account with higher permissions, may additionally have write access to the same database table. This is accomplished by using scope values. The Scope and Role section of these /docs/ explain scope. The concept involves the intersection of three scopes.
- A user account will have a list of roles.
- A client account will have a list of allowedScopes.
- A request for new tokens will include a scope value related to specific functionality.
Previously in this demonstration, the intersection of the user's role, client's allowed scope, and web server scope have been met and access to resources was granted. For demonstration purposes, the backend web server includes an endpoint intended to reject access to resources base on scope restrictions.
In a typically REST API, existing data records can be modified using HTTP methods PUT or PATCH. The collab-backend-api mock database server includes a HTTP request that will attempt to modify an existing record at id=1. The value 1 has been appended to the route url "/api/v1/data/iot-data/1" to specify the record's id. The request is submitted using the PUT method.
  {
    id: 1,
    deviceId: 'iot-device-12',
    timestamp: '2021-09-17T15:32:08.417Z',
    data1: 24.831,
    data2: 27.241,
    data3: 22.307
  },
The backend API authorization code for this route intended to fail. The required scope value is set to "debug.no-scope-will-match". Obviously, this scope requirement will not match "api.write". The purpose of this configuration is to demonstrate the case where a valid access token may fail scope restrictions, even through the token itself is valid. This HTTP request is made with the same access token that succeeded in the above demonstrations. However, based on specific scope restrictions the request will fail with a status 403 Forbidden response.
Press the [Fetch Data] button. This will initiate a PUT request to /api/v1/data/iot-data/1. The access rejection should be displayed on the page.
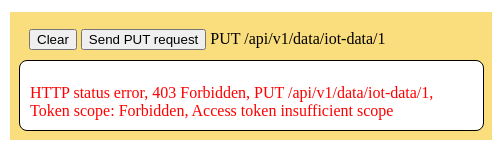
The backend database API log will show the 403 response. There is also a stand alone console log message showing the violation.
Token scope: Forbidden, Access token insufficient scope.
2023-07-09T19:41:59.088Z ::1 403 PUT 1.1 localhost:4000/v1/data/iot-data/1
In turn the web server log will also show the 403 response.
2023-07-09T19:41:59.090Z ::1 403 PUT 1.1 localhost:3000/api/v1/data/iot-data/1
In the left dropdown menu, select "Password Change". This will open a panel explaining the password change function.
One of the benefits of Oauth2 is separation of the user login credentials from the basic operation of a web page. For a user on this page, this creates a problem when they want to change their password, because the password is stored externally in the Oauth2 authorization server. To address this, the web server will accept a /changepassword route which will return a 302 redirect to the change password URL on the authorization server (collab-auth).
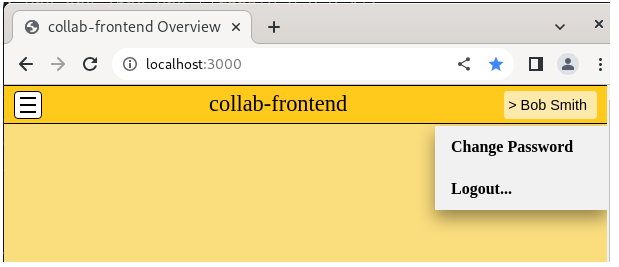
To try this, click "> Bob Smith" in the upper right corner of the page. This will expand the dropdown menu on the upper right of the page showing selections for "Change Password" and "Logout..."
Select Change Password. The web server will return a 302 redirect to the /changepassword path on the web server. Open the collab-frontend web server terminal to check the redirect entry on the web server log.
2023-07-09T14:50:49.406Z ::1 302 GET 1.1 localhost:3000/changepassword
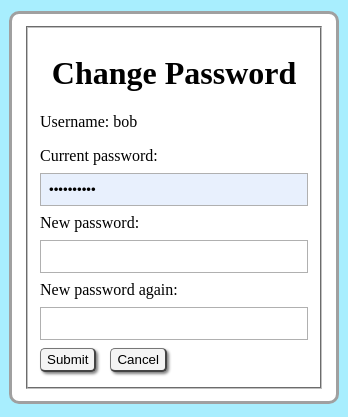
The 302 redirect shown above will send the browser to the authorization server /changepassword URL. Assuming that the browser still has a valid cookie for the authorization server from the previous login, the change password form should be displayed in the browser.
The authorization server log should show the password change form files.
2023-07-09T14:50:49.410Z ::ffff:127.0.0.1 200 GET 1.1 127.0.0.1:3500/changepassword
2023-07-09T14:50:49.442Z ::ffff:127.0.0.1 304 GET 1.1 127.0.0.1:3500/css/password.css
Enter a new password. Since this demonstration is being run using RAM variables, the password may be reverted to the previous value by stopping and restarting the authorization server. Access to the change password function requires that the user account have been assigned role of either user.password or user.admin. In this case username bob has role user.admin so the function is permitted. The authorization server log file should show the password change.
2023-07-09T14:52:42.135Z ::ffff:127.0.0.1 User activity: bob changed password
2023-07-09T14:52:42.136Z ::ffff:127.0.0.1 200 POST 1.1 127.0.0.1:3500/changepassword
2023-07-09T14:52:42.146Z ::ffff:127.0.0.1 304 GET 1.1 127.0.0.1:3500/css/password.css
If the browser does not have a valid cookie to the authorization server, the standard user login dialog will open first. After successful entry of the old password on the user login form, the change password form will open automatically.
In the current version fo the program, it will be necessary for the user to navigate back to the main web page manually after changing their password.
Assuming the above steps have been followed, the browser will actually have two different logins. During the Oauth2 workflow, it was necessary for the user to login into the authorization server to authenticate the identity of the user. This required the web browser to have a separate login cookie for the authorization server. After the browser returns to the main web page with an authorization code, the web server will obtain a second cookie for the main web page. Therefore the browser will have 2 different cookies. To further complicate the concept, the user account may be logged into other unrelated web servers using the same authorization server, thus the browser could have additional cookies.
The "Logout..." selection in the dropdown menu is an <a> tag that will link to the /logout route on the web server. The collab-frontend web server will the remove the cookie from the web server session storage. This will deactivate the browsers cookie for the main web page. Select Logout, the check the web server log.
2023-07-09T15:20:12.152Z ::1 200 GET 1.1 localhost:3000/logout
2023-07-09T15:20:12.166Z ::1 200 GET 1.1 localhost:3000/logout.css
Check the authorization server. No log entries will appear. The logout was limited to the main web page and the browser will still have a valid cookie to the authorization server.
The main web page logout confirmation page includes an additional [Auth Logout] button which is a link to redirect the web browser to the "/logout" route on the authorization server. Optionally, the user can select this link are deactivate the second cookie for the authorization server. This time, the authorization server log will show the independent logout confirmation form.
2023-07-09T15:30:02.232Z ::ffff:127.0.0.1 200 GET 1.1 127.0.0.1:3500/logout
2023-07-09T15:30:02.287Z ::ffff:127.0.0.1 200 GET 1.1 127.0.0.1:3500/css/styles.css
The steps on this page should have successfully demonstrated one way to use Oauth 2.0 for potential use on a home network with web server, SQL database, and IOT devices.
Due to the asynchronous nature of JavaScript, this is a very confusing concept. The diagram at the top of the home page should help clarify the network or architecture part of the process. However there is an asynchronous time component as well. Several Oauth 2.0 references are listed that have timing diagrams that may be helpful.